
The 2026 competition toolkit
Ice sculpting tools haven't changed overnight, but the 2026 competition circuit shows a clear shift toward precision over raw power. Judges now look for structural stability in thinner, more complex joints. Manufacturers are responding with lighter frames and better torque control rather than just higher RPMs.
We've seen a shift away from purely brute force methods. While chainsaws are still essential for the initial roughing out, the emphasis is now on tools that allow for intricate detail work. The increased use of variable speed die grinders and specialized hand tools reflects this trend. There's also a growing awareness of ergonomics and reducing sculptor fatigue, leading to lighter, more balanced tool designs.
A competition kit is split between heavy removal and fine finishing. The difference between a hobbyist set and a pro rig usually comes down to heat management and weight distribution. Here is the gear currently winning at the major festivals.
Chainsaws and die grinders
Chainsaws are the fastest way to clear bulk ice. Gas models provide the torque needed for 300-pound blocks at outdoor events, but the weight and fumes are a liability indoors. Electric saws from Stihl or Husqvarna are the standard for indoor gallery work because they're quiet, though they struggle with deep, sustained cuts in dense clear ice.
Bar length is another critical consideration. A longer bar allows for faster material removal, but it also requires more physical effort and can be more difficult to maneuver. Most competition sculptors prefer a bar length between 16 and 20 inches for a good balance of speed and control. Remember also that a sharp chain is paramount; dull chains are not only inefficient but also dangerous.
Die grinders are the next step down in power, but they’re incredibly versatile. Pneumatic die grinders, running on compressed air, offer consistent power and are relatively lightweight. Electric die grinders, like those from Dewalt and Milwaukee, are more convenient as they don’t require an air compressor, but they can bog down under heavy use. The RPM range is important – higher RPMs are good for smoothing, while lower RPMs provide more control for shaping. Aim for a grinder with variable speed control.
Safety is non-negotiable. A full face shield, hearing protection, heavy-duty gloves, and steel-toed boots are absolutely essential when operating chainsaws and die grinders. Proper training is also crucial. Don't attempt to use these tools without understanding the risks and knowing how to operate them safely.
Sanders and carbide burrs
Once the basic shape is established with a chainsaw and die grinder, it’s time to bring out the sanders and grinders for finer work. A variety of attachments are available for die grinders, including sanding discs, grinding stones, and carbide burrs. Sanding discs, ranging in grit from coarse to very fine, are used to smooth surfaces and remove imperfections. Grinding stones are ideal for shaping curves and creating textures.
Carbide burrs are particularly useful for creating intricate details, like scales on a dragon or feathers on a bird. Different shapes – conical, cylindrical, spherical – allow for a wide range of effects. The key is to use the right attachment for the job and to avoid applying too much pressure, which can cause the ice to chip or crack. Variable speed control is extremely important here, allowing you to adjust the speed to match the task at hand.
Cordless options are gaining popularity, offering greater maneuverability and freedom of movement. Brands like Makita and Ryobi offer powerful cordless die grinders that are well-suited for ice sculpting. While they may not have the same sustained power as pneumatic or corded models, they're a convenient choice for many sculptors. The lower weight is also a benefit when working for extended periods.
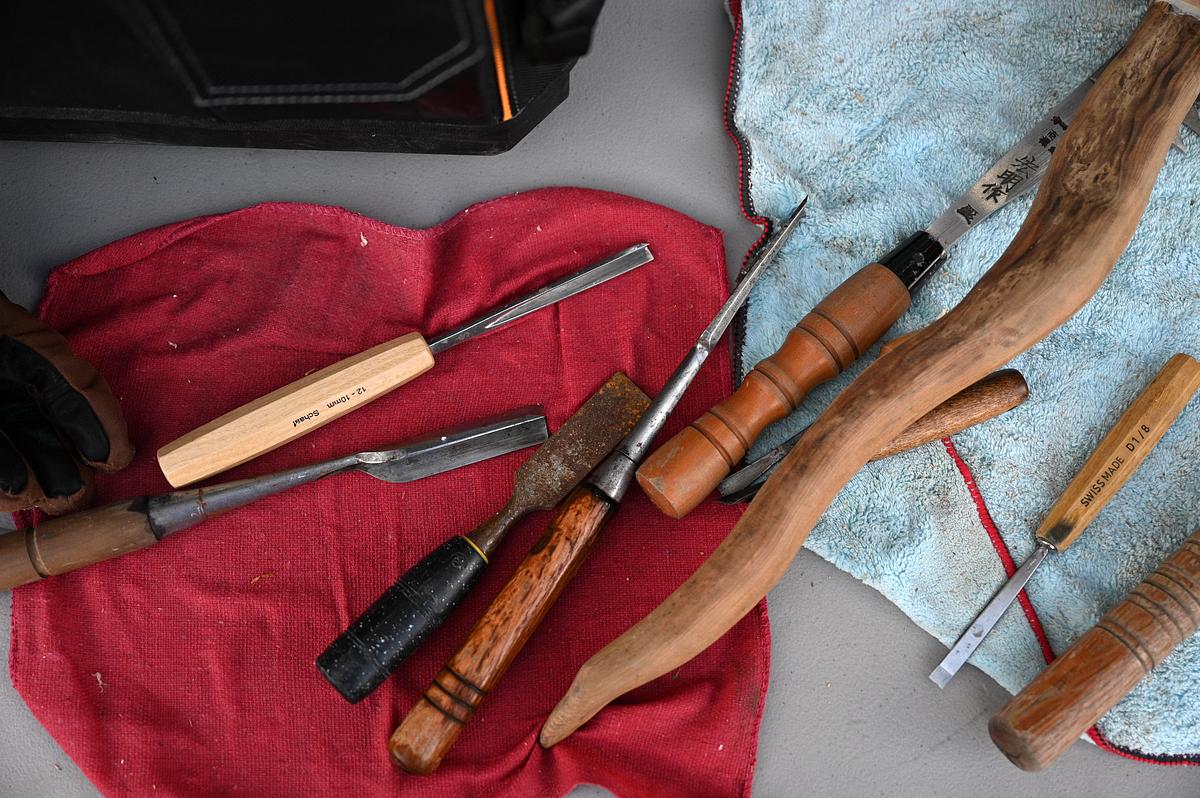
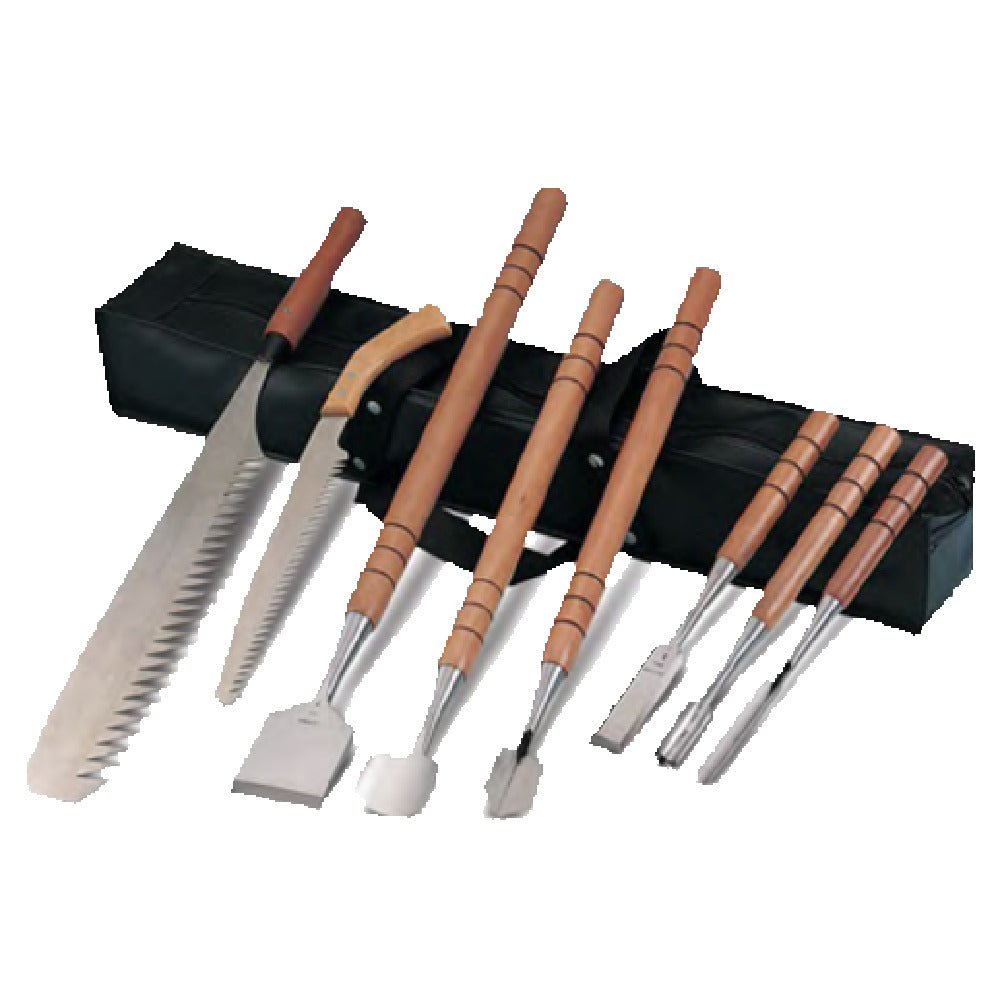
Chisels and files
Despite the prevalence of power tools, hand tools remain indispensable for ice sculpting. A well-stocked set of chisels is a must-have. V-tools are used for creating lines and grooves, U-gouges for shaping curves, and flat chisels for removing larger areas of ice. The quality of the steel is critical; high-carbon steel holds an edge longer and is less prone to chipping.
Sharpening is an art in itself. A dull chisel is not only ineffective but also dangerous. Regular sharpening with a whetstone or sharpening system is essential. Files and rasps are also valuable for refining shapes and creating textures. A variety of shapes and coarsenesses are available, allowing you to achieve different effects.
There’s been a noticeable resurgence of traditional hand-carving techniques in recent years. Some sculptors prefer the greater control and precision that hand tools offer, even for large-scale sculptures. This often involves a combination of power tools for roughing out and hand tools for the finer details. It’s a slower process, but the results can be stunning.
Fusing and welding ice
Creating larger, more complex sculptures often requires fusing multiple pieces of ice together. This is achieved by carefully melting the surfaces to be joined and then pressing them together. Water is the most common fusion agent, but snow slurry can also be used. The key is to create a strong, seamless bond.
Tools used for fusion include spray bottles, torches (used with extreme caution), and specialized fusion irons. The goal is to create a thin layer of water on both surfaces, allowing them to bond when pressed together. Temperature control is crucial – the ice should be cold enough to remain solid but warm enough to fuse effectively. Surface preparation is also important; the surfaces must be clean and free of any debris.
Maintaining structural integrity in fused sculptures is a major challenge. The bond between the pieces of ice is inherently weaker than the ice itself. Sculptors often use internal supports, like wooden dowels or metal rods, to reinforce the structure. Careful planning and execution are essential to prevent the sculpture from collapsing.
Precision and marking
Accuracy is paramount in ice sculpting, and that starts with precise measurement and marking. Compasses, jigs, templates, and levels are essential tools for ensuring symmetry and balance. A compass is used for creating circular shapes, while jigs and templates can be used to replicate complex designs. A spirit level ensures that the sculpture is perfectly level.
Traditionally, sculptors transferred designs onto the ice by hand, using stencils and rulers. However, the use of projectors is becoming increasingly common. A projector can display a design onto the ice, allowing the sculptor to trace it accurately. This is particularly useful for complex designs or large-scale sculptures.
Digital tools are also playing a role. Some sculptors use 3D modeling software to create designs, which can then be transferred to the ice using projectors or other methods. The ability to visualize the sculpture in 3D before starting to carve can save time and reduce errors.
Safety gear and protocols
Ice sculpting can be dangerous if proper safety precautions aren’t taken. Personal protective equipment (PPE) is absolutely essential. This includes safety glasses to protect your eyes from flying ice chips, heavy-duty gloves to protect your hands from cuts and abrasions, a waterproof apron to keep you dry, and steel-toed boots to protect your feet.
Safe handling practices are also crucial. Always use caution when operating chainsaws, die grinders, and chisels. Keep your hands and feet clear of the cutting edges. Never work alone. Ensure a well-lit and organized workspace to prevent trips and falls. Be aware of your surroundings and the location of other people.
Emergency procedures should be established before starting any sculpting project. Know the location of the nearest first aid kit and how to use it. Have a plan for dealing with injuries, such as cuts, abrasions, or eye injuries. It's always better to be prepared for the unexpected. A clear plan can make all the difference.


No comments yet. Be the first to share your thoughts!