
The Shift to Temperature Control
Ice sculpting has long depended on basic tools like chainsaws and chisels, with the main hurdle being ice's instability. Ice cracks and melts unevenly, problems traditional tools often worsened. Sculptors were at the mercy of ambient temperature and tool friction. That's changing now.
Temperature-controlled tools represent a fundamental shift, moving ice sculpting from reactive adjustments to active control. Sculptors can now manage melting for smoother surfaces, sharper details, and stronger structures, expanding artistic possibilities.
Previously, maintaining precise temperatures was impossible, forcing sculptors to work fast and often sacrifice detail or risk cracking. New tools allow for sustained, delicate work, offering a level of control akin to switching from watercolors to oils.
Early efforts to manage melting involved insulation and chilled spaces, but these were often impractical. The breakthrough came with portable heating elements integrated into tools, allowing sculptors to locally control temperature and 'steer' the melting process. This development is reshaping the field.
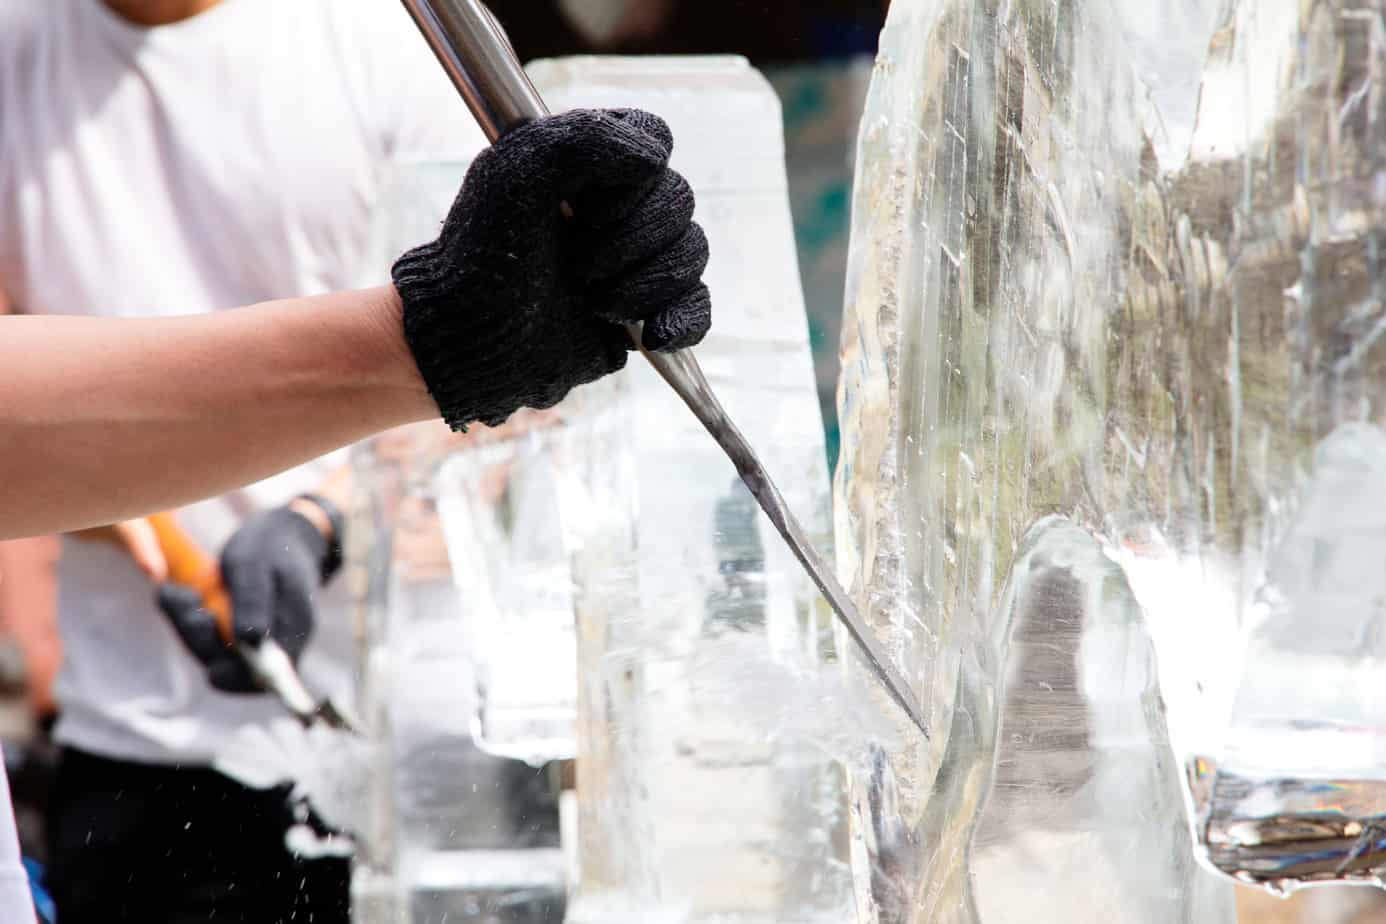
Heated Chisels: Precision Melting
Heated chisels are a straightforward application of temperature control. A heated blade melts ice as it cuts, creating smooth surfaces and enabling previously unattainable details. Different chisels use various heating methods, each with pros and cons.
Electric resistance heating, with an embedded element, is common, offering affordability and control but sometimes uneven heat. Induction heating is more expensive but provides precise, consistent temperature by directly heating the blade with an electromagnetic field. Induction-heated chisels yield impressive results, especially with harder ice.
Advantages include finer detail, less chipping, and the ability to work with hardened ice. Mastering a heated chisel requires practice; heat must be adjusted based on ice temperature, chisel speed, and desired effect. Too much heat creates an over-melted surface, while too little reverts to traditional chisel limitations.
Many sculptors suggest starting with lower temperatures and increasing heat with experience. Investing in a quality chisel with a well-insulated handle is also recommended. The learning curve is real, but the precision and artistic control gained are significant.
Temperature-Regulated Chainsaws & Die Grinders
Adapting chainsaws and die grinders with temperature control is complex but offers substantial benefits for large-scale sculptures and roughing out shapes. Managing cutting heat prevents excessive melting and ensures clean, precise cuts.
Companies like IceSculptingTools.com offer chainsaws with integrated temperature regulation, often using coolant circulation to prevent overheating. Blades are made from specialized alloys for heat transfer, with some manufacturers exploring ceramic coatings to reduce friction and improve cutting.
Die grinders are similarly adapted with temperature-controlled bits and housings. High rotational speeds generate significant heat, making precise regulation critical to prevent seizing or rapid melting. Promising designs combine coolant circulation with advanced bit materials.
Safety is paramount with heated cutting tools due to burn risks. Always wear protective gear like gloves, eye protection, and long sleeves. Maintain awareness of surroundings and safe working distances. A cautious approach is essential when using these powerful tools.
Smart Tool Integration: Software & Sensors
The 'smart' aspect involves integrating sensors and software to monitor ice temperature and adjust heating automatically. This minimizes errors, allowing sculptors to focus on artistic execution.
Infrared sensors measure ice temperature near the cutting point, feeding data to a microcontroller that adjusts heating for consistent temperature. Prototypes feature real-time displays and customizable profiles, allowing sculptors to fine-tune tools for specific conditions and effects.
Bluetooth connectivity allows remote monitoring and control via smartphone or tablet. Data logging tracks temperature fluctuations and identifies optimal settings, improving efficiency and consistency.
Open SDKs or APIs for custom control are not yet widely available but represent a logical next step. The potential for software integration, enabling automated routines or custom temperature profiles, is enormous, though current focus remains on refining existing systems.
Ice Impressions’ Tool Testing & Results
Ice Impressions has spent the past year testing new temperature-controlled tools to determine their effectiveness for different sculpture types and identify drawbacks. Testing focused on delicate floral designs and large, geometric shapes.
Heated chisels were invaluable for floral designs, enabling incredibly detailed petals and leaves through precision melting. Induction-heated chisels provided the most consistent results but were more expensive; electric resistance chisels served as a good alternative for less demanding
For larger, geometric sculptures, the temperature-regulated chainsaws were a significant improvement. They allowed us to rough out shapes quickly and efficiently, with minimal chipping or cracking. However, we did encounter some issues with overheating on particularly warm days. We found that using a combination of coolant and frequent breaks was essential to prevent the tools from malfunctioning.
We also experimented with temperature-controlled die grinders for creating intricate patterns and textures. The results were promising, but the learning curve was steeper. It takes time to master the technique of controlling the heat and pressure to achieve the desired effect. Overall, our testing confirmed that these new tools offer a significant advantage over traditional methods, but they require skill, patience, and a willingness to experiment.
Maintaining Tool Performance: Calibration & Care
Temperature-controlled tools require regular maintenance to ensure optimal performance. Calibration is particularly important, as the sensors and heating elements can drift over time. Most manufacturers recommend calibrating the tools every six months, or more frequently if they are used heavily. This typically involves comparing the tool’s temperature reading to a calibrated thermometer.
Cleaning is also essential. Ice chips and debris can build up on the heating elements and sensors, affecting their accuracy. Always disconnect the tool from the power source before cleaning and follow the manufacturer’s instructions carefully. Avoid using abrasive cleaners, as they can damage the delicate components.
Proper storage is crucial to prevent corrosion and damage. Store the tools in a dry, cool place, away from direct sunlight and extreme temperatures. It’s also a good idea to apply a thin coat of lubricant to the moving parts to prevent them from seizing up. Common problems include faulty heating elements, damaged sensors, and worn-out seals. Most of these issues can be resolved with basic repairs or replacement parts.
Investing in a good quality maintenance kit and familiarizing yourself with the tool’s manual can save you a lot of time and money in the long run. Taking care of your tools is not just about extending their lifespan; it’s about ensuring consistent, high-quality results.
Future Trends: Beyond Temperature
While temperature control represents a major leap forward, the future of ice sculpting tools is likely to be even more innovative. Emerging technologies like laser cutting and ultrasonic vibration hold the potential to revolutionize the craft, offering even greater precision and control. Laser cutting, for example, could allow sculptors to create incredibly intricate designs with minimal waste.
Ultrasonic vibration could be used to fracture the ice along precise lines, creating clean, sharp edges without the need for traditional cutting tools. Both of these technologies are still in the early stages of development, but the initial results are promising. The biggest challenges are cost and scalability.
I suspect that artificial intelligence will also play an increasingly important role in ice sculpting. AI-powered design tools could help sculptors create complex 3D models, and AI-controlled robots could automate some of the more repetitive tasks. This wouldn't replace the artist, but it would free them up to focus on the creative aspects of the work.
It’s impossible to predict the future with certainty, but one thing is clear: the world of ice sculpting is on the cusp of a technological revolution. The tools we use today are vastly different from those used just a few years ago, and the pace of innovation is only accelerating. It’s an exciting time to be involved in this art form.


No comments yet. Be the first to share your thoughts!